Installing Roof Trusses
on kit homes

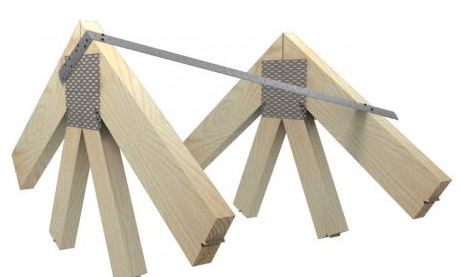
Prefab roof trusses are supplied and certified by your kit home provider. As a matter of fact most authorities demand certified framing to be delivered pre-built these days, so building roof trusses on site can make certifying them a trial. In most circumstances, they are supported by external walls, with the bottom chord sitting on the ribbon plate of the walls at the 'heal'. Modern roof framing is "gang nailed" for superior rigidity and strength. There are many types including 'common' or 'fink' trusses, 'howe', 'king' and 'queen' trusses.
Framing a roof involves:
1. Laying out the trusses on top of the walls
2. Fabricating a gauging rod
3. Setting up a solid prop for the first truss
4. Standing and temporarily bracing trusses
5. Plumbing the trusses
6. Installing cyclone ties
7. Installing speedbrace
8. Internal wall to roof truss brackets

How to install roof trusses
First thing to do is slide the trusses onto the wall frames (easier with two people), lay them evenly along the house framing ready to stand. Fabricate a gauging rod to use as a template for truss spacing (1200mm/4ft). You can also set up a solid prop at the gable end to help with beginning the first truss and to tie off from.


The first truss should start 90mm (3.5ins) from the gable end (on the inside of the ribbon plate edge) to make space for gable end studs, unless you are building an extended gable with eaves.
Stand the first truss and nail it temporarily to the solid prop. Plumb the truss with a straight edge level until vertical, then secure it to the prop. Secure the truss at the heal (90mm from end) with cyclone ties.
Stand another truss, use your gauging rod to find the 1200mm (4ft) centre, and temporarily nail a brace (a roof batten is good) across the two standing trusses. Plumb the second truss then nail off the temp brace securely. Check the centres with the gauging rod at the heals and install cyclone ties. Plumb each truss, brace and tie off as you go. The second last truss will probably be an extra to keep the centres standard maximum.
 Roof truss bracing
Truss roof construction
The second stage of truss roof construction will detail how to install truss noggins, speed bracing, gable end studs and bottom chord ties.
Truss noggins
To stabilise truss heals and provide upper wall cladding support install noggins along the top of the ribbon plate between all trusses using skew nailing. This may have to be done after veranda skillion rafters are installed, as they are usually fastened along the heal of the top chords.
Roof truss bracing
Your kit home plan will have a roof truss bracing plan which will indicate how to install the speed brace. Starting from the apex on a gable end, wrap the speed brace over the top chord and nail down with 3-4 nails. Lay the brace across the truss top chords and attach over the heal of the last truss and nail over and around the top plate and down the stud.
 Roof truss bracing: Pryda image
Follow the supplied speed brace plan, diagonally crossing the trusses so each truss gets a minimum of four brace attaching points. Use at least two nails into the top chords where the brace crosses. Where two braces meet on a top chord use 4 nails. Once the brace is secured remove the temporary truss bracing, and the solid prop.
Gable end framing studs
Measure, cut and nail/screw gable end studs vertically on the outside trusses to provide a flush face for cladding (easy).
 Gable end framing Gable end framing |
 Roof truss brackets Roof truss brackets |
Internal bracketing
Internal, non-load bearing walls must be stabilised and secured to trusses with "L" brackets. Where the trusses pass at right angles to walls, attach a bracket to the top plate and secure to the above truss. For walls that run parallel to trusses, a noggin needs to be installed across the wall and between the trusses, before securing with two brackets.
 Bottom chord ties
Bottom chord ties
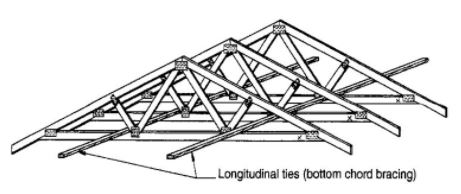
Lastly, longitudinal timber is secured from one end of the truss group to the other, along the truss bottom chords. It assists in limiting movement of the bottom chord, especially where there are no internal walls.
Go on to my Roofing page
Go to my Framing page
Go to House Construction
Return to the Kit Home Basics Home Page


