Installing guttering on
build it yourself kits
Installing guttering on your kit home is the second stage of the roofing system. The main purpose of a rain gutter is to protect a building's "foundation" by channeling water away from its base. They also help to reduce erosion, prevent leaks in basements and crawlspaces, protect painted surfaces by reducing exposure to water, and provide a means to collect rainwater for domestic supply.
Rain gutters can be constructed from a variety of materials, including cast iron,lead, zinc, galvanised steel, painted steel, copper, painted aluminium, PVC (and other plastics), concrete, stone, and wood. After installing the battens on the trusses, the guttering needs to be installed. As the roofing iron sits on the fascias, to which the guttering is secured, the guttering goes on before the iron, OK? It makes it a little cumbersome to get the iron on the roof, but that's the system. This page shows how to install simple straight diy gutters to harvest your rainwater. Rain gutters come in many forms...lets check some out.
Installing guttering: gutter styles
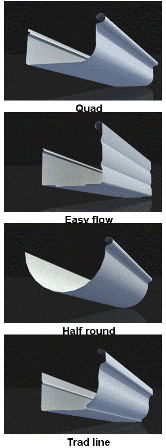
Guttering comes in dozens of profiles which are all designed for specific use in regional and varying weather conditions. It is also made in modern square form through to traditional styles and can be made on site with no joins. When you chose your kit inclusions you would have specified a gutter profile, fascia and colours to suit your metal roofing.
Included in your diy guttering kit
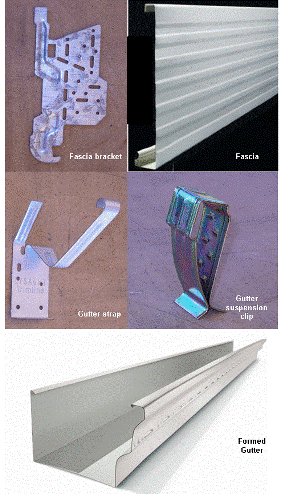
- Specified precut guttering
- Gutter stop ends
- Downpipe droppers
- Pop rivets (color coded)
- Specified fascia
- Fascia brackets
- Suspension clips
- Gutter straps
- Pop riveter
- Tin snips or Nibbler
- Spirit level
- String-line
- Silicon
- Gal nails or screws
Installing guttering: roof fascias
Installing a roof fascia bracket is relatively easy. Start by fixing one at each end of the job. Use a level to get them vertically level and set the top edge to 40mm above the top edge of the truss, the height of the roof battens. Now temporarily set a third on a centre truss end and string a line from one end to the other and get it level then fix it to the truss. Screw or nail home the rest of the brackets along the string line. Keep the line tight and sight it up occasionally to make sure it isn't sagging.
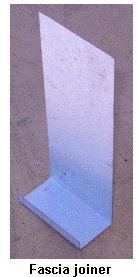
Now raise the roof fascia to the brackets. If you don't have help, use a rope or scaffold to raise the other end. Place the fascia over the top of all the brackets, use a temp brace to hold one end at the marked end, then pull it down and snap it home on the base. Continue to snap them home on all the brackets. Pop rivet a fascia join behind the fascia where it is needed. Once the fascia is installed, pull the protective plastic film off.
Installing gable end fascias
Before installing guttering, the first job is to attach the fascia brackets to the top chord of the gable truss, starting at the apex. The bracket can be bent at right angles where there is a line of elongated holes, so it can be nailed to the outside of the truss. Make sure each bracket is at right angles to the top chord and ensure the top of the bracket is level with the top of the battens and secure with three nails. You can use a string-line to align the rest of the brackets down the truss.
The gable end fascia must be trimmed to achieve a vertical join at the apex connection and where it meets the the house front fascia, a pop riveted corner mould will help tidy up the join.
Assembling your diy guttering
Lay the guttering out on a saw horse beneath the truss line making sure you have it facing the right way. At the spouting end, the droppers need to be installed. Mark an outline of the dropper in the base of the gutter near to the end and carefully cut out a hole. Place the dropper in the hole and check it is a good fit, then bore rivet holes through the flange edge and gutter base. Lay a good bead of silicon around the topside of the hole push home the dropper and rivet it off. Clean of excess silicon.
Next we install the rain gutter ends. Bore enough holes in the end flanges and gutter to make sure it will be secure. Lay another bead of silicon around the end of the gutter, place the gutter end in place and rivet home. Again, clean off excess silicon. Now remove the protective plastic film from the gutter.

Installing guttering
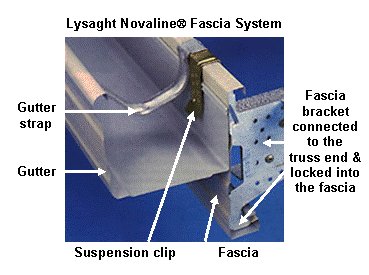
So now you can see how this complete guttering system kit comes together. Roll/snap on suspension clips over the fascia at one metre intervals.
Hoist the gutter up carefully using rope systems (or help if you have it), push/pull the gutter vertically between clip and fascia. The clips have extruded 'teeth' which help you position the gutter up or down on the gutter rib to get it to fall correctly. Use the highest tooth for the high gutter end and the lowest tooth for the outlet end. Aim for a 1:500 fall when installing guttering.
Now fix the internal gutter straps over the roof fascia by rolling the end into the outer outer bead of the gutter, then bending the clamping tab down over the top of the fascia.
There we are, your diy gutters are installed. Our next task is to install insulation so go to our
roof insulation page
. Or go to the 'how to lay'
roofing iron page
Go back to House Construction
Return to homepage


