Installing Exterior Sliding Doors
Installing exterior sliding doors in your kit home requires a little pre-thought and a little help, but any handy person can accomplish it, to give a self built home the outdoor feel of big glass doors. As with the aluminium windows, sliding glass doors come with reveals pre-installed. These reveals allow the door to be easily framed and architraved.
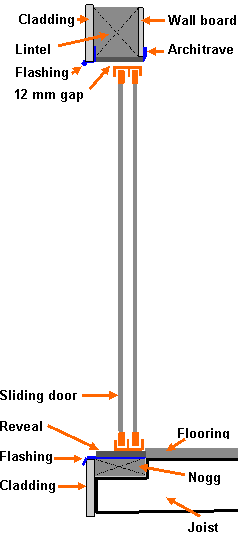
Initial work on the bottom plate of the frame needs to be done to accommodate the door. Select a place that will be well supported by joists, cut a piece out of the bottom plate the exact length of the base reveal plus 2 mm, then and cut a 90mm wide by 50mm deep check out at the ends of the joists. This allows a new 90x50mm bottom plate/nogg to be installed under the length of the door. If the door ends between two joists, it is wise to add support noggs.
Hint 1: Check the level of the bottom plate now.
Pack to level if necessary, give the original and new cut plate ends a lick of paint, then nail or screw the new bottom plate into position. Recess the screws and seal/caulk the recesses as well as the frame corners help keep the moisture out. If you are installing a sliding glass patio door, add a packer strip the width of the cladding/bricks to accommodate the deck or paving butting up to the house if required. Install some galvanized flashing with gal nails to create a sill under the door and over the edge of the cladding.
Hint 2: Position the flashing nails so they will be hidden under the door when the job is finished.
Hint 3: Remove the sliding glass before manouvering the door. Lift the glass frame up and pull out at the base to remove it.
Installing exterior sliding doors
Now we are ready to install the door. Pre-drill a screw hole on either side of the the door uprights inside the flanges and or through the reveals. Check how your door is to be secured as some doors have outer flanges for this purpose. Have a couple of heavy screws and a cordless drill ready. Put a heavy bead of sealant along the flashing under where the door will be placed. With help, lift the door into the ready-made space in the prefab frame. Position it so the reveal edge will allow the wall board/gyprock to be flush. Centre it and temporarily secure with a screw either side.
Replace the removed slider by sliding it up in the top recess and then down into place in its wheels. The door should be level as it was checked before the sill went down. Now check for plumb. Remember to use the level on the door rather than the reveal. Pack it out if required and check the door slides easily and closes parallel to the frame, then screw home the sides and the base. Add an extra bead of (colour-matched) sealant along the front edge of the base. It's pretty much done now. Consider adding a top sill from under the cladding if required.
Slot in the sliding screen door by lifting it into the top recess and dropping the wheels onto the runners. You may have to lift the springed wheels up to get them positioned correctly. Most kit home doors come with pre-installed sliding door hardware (closers and locks etc), but if not, the door will be pre-drilled for easy installation, so just study and follow the directions. So exterior sliding doors are not that difficult for a handy person to accomplish.
After the doors and windows have been installed, it's time to visit our housewrap and cladding pages.
Return to Exterior Wall Cladding or go to Kit Home Basics homepage


