Installing Exterior Doors in kit homes
Installing exterior doors in kit homes recently became a handy persons dream with the advent of 'prehung' assemblies being offered by door manufacturers.
As a way of value adding and ease of installation, a kit home exterior front door will arrive fixed to a completed frame, squared and braced.
Most of the difficult estimations are eliminated.
Exterior doors are available in 2 standard sizes:
2040
x 820 x 40 or 2340 x 820 x 40.
If you are installing exterior doors from scratch you will need these approximations to be accurately measured to build your door frame.
Door frame measuring
Width...
Door = 820mm
Jambs 19mm x 2 = 38mm
Plumbing jamb allowance = 10mm
Clearance between door & jambs x 2 = 4mm
Total trim width = 872mm (between frame trimmer studs)
Height... (excluding door sill)
Door = 2040mm
Head jamb = 19mm
Clearance between door & head jamb = 3mm
Floor covering allowance = 20mm
Total trim height = 2082mm
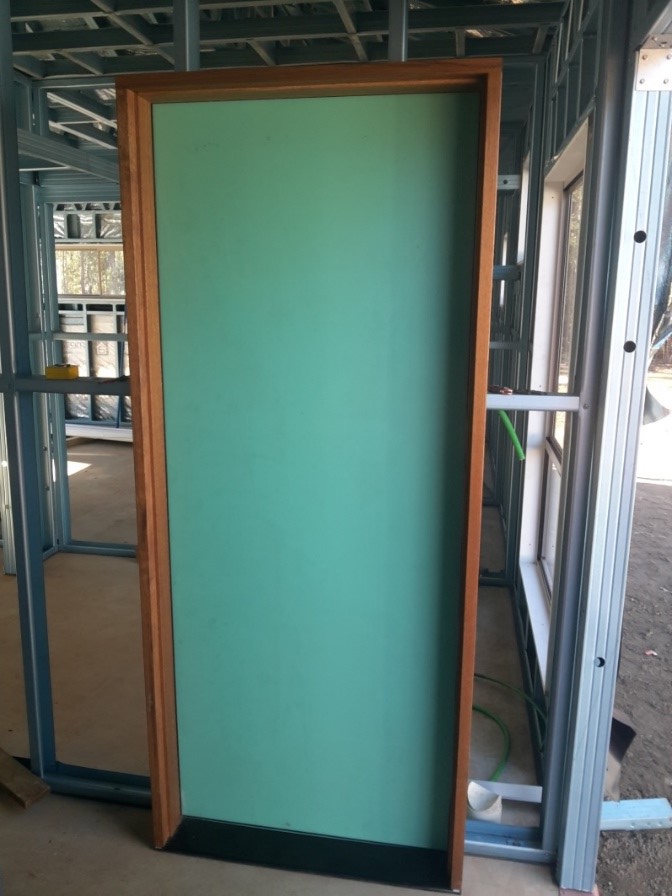
 Pre-hung external door
What is a prehung door ?
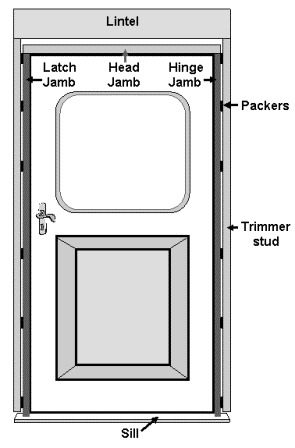
If you build your own house, a prehung door is awesome. In the picture above you can see that the external door is delivered completely installed in a doorframe: stiles, headjam, hinge jam, latch jab, sill and built by pro carpenters at the factory. Just slot it into the frame and pack it out.
Installing exterior doors
When you specify your kit home inclusions , do yourself a favour and choose 'prehung exterior doors' when installing exterior doors in a kit home.
The above measurements will have been cut and done in the factory, with the sill checked out and mortised with the jambs, and as the kit supplier also made the prefab frames , the door assembly will slot neatly inside the door stud trimmers and lintel.
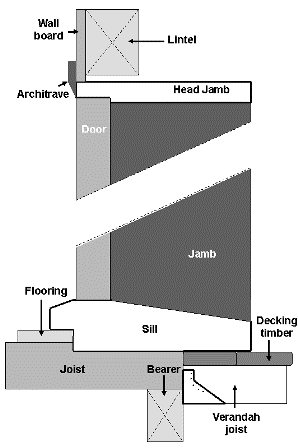
The first thing you will need to do is check out a section of the joists to set the door sill in place (see the diagram to the right).
Level accuracy is important so place a dummy sill in place and check. Keep in mind the inside edge of the jambs need to line up 10mm past the trimmer so they level up with the inside wallboard (drywall).
Tip 1: You may need supporting noggins depending on where the door is positioned over the joists.
Tip 2: Plane a couple of mm's off the back edge of the jambs to aid architraving.
Now remove the door from the assembly.
Tip 3: While the door is off, check the base has been sealed, if not paint it now.
Keeping the frame braces intact, drop the frame into position. I'll bet it fits better than you thought. Use a couple of speed clamps to hold the jambs to the trimmers. There should be 4-5mm between each jamb and the trimmer to help plumb them and there should also be a few mls above the head jamb.
Tip 4: Don't nail through the head jamb into the lintel.
Set the sill in place on your checked out joists (and support noggin if required), check it is level, then speed clamp. Slightly release the jamb clamps then move the jambs forwards or backwards until they are vertically plumb and pack out the space between the jambs and trimmers then re-clamp.
Theoretically, the assembly should be square, but check it anyway. You may need to release/remove the braces that are holding it square to adjust it if necessary. Now finish packing out the jambs, ensuring the areas behind the hinges and the door latch are well supported. Add a couple more speed clamps on the hinge side and re-attach the door to the frame using a couple of screws to see if it swings home and has equal gaps all round. After a last check for levels and plumb, you can nail it off.
Supplied door furniture for your exterior front door can be easily installed (if they are not already) as the holes will be pre-drilled in the door to take the lock-sets and the jambs to take the striker.
So you can see, installing exterior doors can be a breeze with prehung doors. If you research the door manufacturer sites you will see that prehung doors are now the norm with exterior door installations and come in all styles to fit your kit home design.
For interior door information go to our interior door page Now the exterior doors and windows are installed, you can visit our house wrap and cladding
Go to kit home basics home page .


